FINAL STRETCH
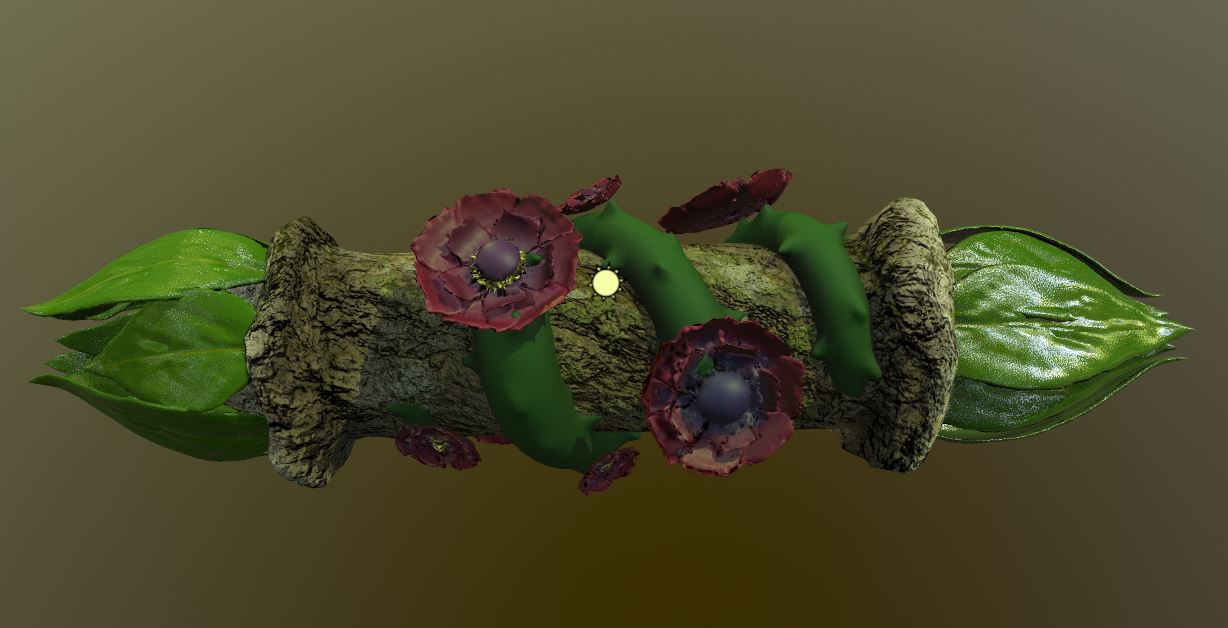 Finally threw the final model into substance painter where I began to apply the textures and materials that would suit the design of the nature scroll. Most of my time was spent on looking for and experimenting with downloaded nature based materials such as the bark and the mossy rock on the base of the scroll. It took me even more time to figure out how to texture and paint the leaves and vine since there wasn't any obvious texture or material to turn to. Instead I had to create fill layers with the base colour green and then hand paint the vines of the leaves over it using a black mask. After that I added a noise height map over the leaves so that they would have a nice cellular look to them when viewed close up and this texture I used on the vines as well. The flowers were done in a similar fashion as I applied a fill layer for the base colour and then manipulated the opacity of a white brush over a black mask to reveal the subtle fade to blue near the centers. After I went in and applied a yellow touch to the stamen of the some of the flowers as to give it a more natural and less mechanical look.
 The
biggest, most time-consuming problem occurred when I was bringing my scroll into
Marmoset Toolbag as the texture sets for the scroll base and vines would not
export out for an unknown reason. The textures would be black or white with no
information on them and with no indication as to why. When I attempted to export
out just those texture sets, my laptop would freeze at 0% and if it did export
the files were blank. I even had Dan try to come and aid me and even he couldn’t
understand why it was happening and since the version of Substance Painter I
have on my laptop is a more recent version, I couldn’t open the file on the
school computer’s because Substance isn’t backward compatible.
The
biggest, most time-consuming problem occurred when I was bringing my scroll into
Marmoset Toolbag as the texture sets for the scroll base and vines would not
export out for an unknown reason. The textures would be black or white with no
information on them and with no indication as to why. When I attempted to export
out just those texture sets, my laptop would freeze at 0% and if it did export
the files were blank. I even had Dan try to come and aid me and even he couldn’t
understand why it was happening and since the version of Substance Painter I
have on my laptop is a more recent version, I couldn’t open the file on the
school computer’s because Substance isn’t backward compatible. 
Dan instead said that my last-ditch
effort to get my model textured would be to open the high poly in Zbrush and polypaint
directly onto the model, export that out, and then bake in Marmoset. After
having painted just the pieces necessary however, when I tried to export the
highpoly out with the paint and open it into Marmoset, the polypaint would not
be on the model. When I attempted to look up how to do it online, all the
tutorials would say to bring the model to it’s lowpoly form, have UVs, and then
creature texture maps in Zbrush from that. The problem here was that I had
painted directly onto my highpoly which had no Uvs and when I lowered the
divisions my textures were also simplified into a blurry mess. When I tried to
make texture maps from the models, stretching would occur around where the rock
texture and bark texture were stitched together by moss and it looked atrocious.
 Thankfully there were some people who
eventually came into the lab and were more familiar with Zbrush and Substance
and after attempting to try and figure out how to export the polypaint one of
the guys helping just said that it would be far easier to just retexture those
missing pieces in substance on the lab computers and then export from there to
use in Marmoset than continue to struggle to get the polypaint. This was a much
better plan and with his help we managed to separate out the scroll base and
vines from the highpoly model and open them into substance without the leaves
and flowers so that I could then just texture them separately, export their
maps, and then just throw them into a new shader in Marmoset Toolbag where my
flowers and leaves were waiting.
Thankfully there were some people who
eventually came into the lab and were more familiar with Zbrush and Substance
and after attempting to try and figure out how to export the polypaint one of
the guys helping just said that it would be far easier to just retexture those
missing pieces in substance on the lab computers and then export from there to
use in Marmoset than continue to struggle to get the polypaint. This was a much
better plan and with his help we managed to separate out the scroll base and
vines from the highpoly model and open them into substance without the leaves
and flowers so that I could then just texture them separately, export their
maps, and then just throw them into a new shader in Marmoset Toolbag where my
flowers and leaves were waiting. SCROLL HIGH POLY


 Since Zbrush continued to crash
when I would use the symmetry tool for the inside of the flower, what had
originally been marked to be a day’s work became two days work as I tried to
work out the limitation of the program. Once completed I moved on to the main
form of the scroll model itself, which I wanted to have rock rings to act as
the secure ties of the scroll itself and to have groomed leaves to form the
handled points of the ends. While I tried to begin in Zbrush, I found it much
easier to construct a base form in Maya and then use that to work off of as I
built up clay around the ends and then shaped them down to form the hard rock
edges I wanted. Once I was happy with the general shape of the rock formation,
I began to model out a single leaf using the same methods I had for the petals
of the flower from a polyplane, using the taper, bend, crease tool to give the
leaf thickness and shape. Importing it into the scroll tool, I then duplicated
and rotated each leaf into the desired placement, scaling a few down as I
overlapped them.
Since Zbrush continued to crash
when I would use the symmetry tool for the inside of the flower, what had
originally been marked to be a day’s work became two days work as I tried to
work out the limitation of the program. Once completed I moved on to the main
form of the scroll model itself, which I wanted to have rock rings to act as
the secure ties of the scroll itself and to have groomed leaves to form the
handled points of the ends. While I tried to begin in Zbrush, I found it much
easier to construct a base form in Maya and then use that to work off of as I
built up clay around the ends and then shaped them down to form the hard rock
edges I wanted. Once I was happy with the general shape of the rock formation,
I began to model out a single leaf using the same methods I had for the petals
of the flower from a polyplane, using the taper, bend, crease tool to give the
leaf thickness and shape. Importing it into the scroll tool, I then duplicated
and rotated each leaf into the desired placement, scaling a few down as I
overlapped them.  The vine
was the simplest of the creations as I just modeled out a helix shape, changed
the divisions, spaced out the coil, and then added a bit of asymmetrical design
to the base form so that it appeared more natural instead of mechanical. Using
the snake hook took, I pulled out the thorns and then once again, imported the
pieces into the scroll and fit it together with the gizmo. This was also the
process used for the flowers.
The vine
was the simplest of the creations as I just modeled out a helix shape, changed
the divisions, spaced out the coil, and then added a bit of asymmetrical design
to the base form so that it appeared more natural instead of mechanical. Using
the snake hook took, I pulled out the thorns and then once again, imported the
pieces into the scroll and fit it together with the gizmo. This was also the
process used for the flowers.
Overall,
I am quite happy with the highpoly design of my scroll and found that the most
difficult aspects were simply made more difficult due to the program giving up
the ghost on me several times. For the future, I definitely will be working more carefully with the program as I move forward into the lowpoly and ID map so that I can avoid wasting time frustrated over the program.
BOOK / SCROLL CONCEPT
 For the second project of the class, the parameters of this assignment is to conceptual a design for a book of any genre which I will be modeling and sculpting in zbrush. While the assignment specifies a book design, during my research I discovered a few fun designs for scrolls which really caught my attention. Much like my previous canister design, the cylindrical look is very aesthetically pleasing and the fun attachments which could be added seem like it would be fun to model. If I was allowed to progress with the scroll concept, I believe I'd like to take the more fantastical look or even "demonic" aesthetic. Having also done some research on actual book designs, I believe it would be fun to implement the more floral pieces into the overall design through winding thorns, closed buds on the ends, the seal being an open flower, and maybe even dangling moss to give it a more antique look.
SCI-FI FINISHED MODEL
The main inspiration that I drew from for my design was more vertical, cylindrical containers rather than the more popular box shaped crate. I wanted to give myself something relatively easy to model and texture, but something I would like in the final product which led me to draw a lot on medical crate and health pack designs that are in nearly every video game. With my initial research for crate designs to bounce off of, I found a selection of various vertical crates and canister designs that I liked and wanted to draw inspiration from, many of them being more unconventional shapes such as hexagonal or triangular in shape. While looking at more common med-pack designs, I found that several had similar colour composition of mostly white accented with either green, blue, or red, or the reverse. While initially I was contemplating the idea of making my canister white, I decided to add a bit more personal touch that would make it a bit more unique but still recognizable as I pulled from the colour balance of another concept design.
Object list, all made by me: canister top, bottom, handle, and latches.
Textures used: metallic roughness textures taken from substance painter.
 Most of the problems I face in the beginning were simply on the balance of painting to modeling which would be required for this project as I wasn’t sure how complex the initial model needed to be when I knew that once in painter, much of the fine details could be added there. Another problem which mostly caused me issue after I had UVed and imported it into substance, was that my model was a single object which proved to make the painting process harder as I had to personally paint each spot so that it wasn’t all a single colour or texture. Once I did finish the model, the only other problems I faced were when I went to implement an opacity and emission map on the model in substance painter, which thankfully I found tutorials on substance painter’s youtube about how to go about implementing these maps without issue. Overall, the process went relatively smooth, besides the issue with the solid object.
Overall time spent on this project was roughly a month, three weeks maybe, as I didn’t feel rushed by the project’s due dates or by the complexity of my model. Most of the time when into the modeling and UVing itself as the UVs for this shape were difficult to unravel.
Much of the references I used outside of class are located on substance painter’f forums or youtube channel as I watched an extensive amounts of video tutorials for the maps I was not confident in doing.
SCI-FI CRATE UVING & LOW POLY PROGRESS
 For week three I moved onto the low-poly modeling and UVing my canister. Since the previous update, I did add a few more details to the crate model, including a couple latches on the top portion of the canister and the inlaid portion with the medical cross to indicate the health pack that I was originally going for. These were simple additions that I had wanted to add but was on the fence as to whether I should put it directly into the model or if I could give the illusion of these in Substance. Ultimately, I decided to add it to the original model since the rule of thumb would be 50/50 modeling to painting.
  The trickiest part of the Uving process for this design is that the main form of every shape is cylindrical and has to be unwrapped piece by piece. This is made a bit harder since I merged all the pieces so the Uvs became rather muddled and stacked on top of each other. Even so, there only appears to be some texture stretching along the top and bottom of the main form where I had extruded from the original primitive. Pulling apart the Uvs has been the most time consuming but hopefully with a bit more time the UVs will be easily differentiated so that I can manipulate them into a clearer and balanced set.
SCI FI CRATE HIGH POLY MILESTONE & PROGRESS

After attempting a few variations on the base shape of the crate, I settled on a more cylindrical canister design which resembled my concept design more than the triangular shape which I had been leaning towards. The change was a best fit for my skill level as adding in the pieces for fastenings and rivets was much more difficult than anticipated on a prism shape than a cylindrical shape. Moving from there, I took much of the reference for my model from the canisters which first drew my eye due to the opening mechanism which I hope I can replicate once I figure out how to go about fitting those pieces together and within the base shape.

The biggest hurdle was figuring out whether or not to model every little rivet and divot in the base model, which would be a much larger challenge than I had anticipated, or, much like the fastenings on the knife project, use substance painter to put in those key details. This I assume comes down to how close the object is the be examined while in the world it fits into. I think in the end I will leave the rivets to substance painter but there are a few other small details I could go into and model out, so that there is a good balance of modeling to painter without just using painter to mask modeling.

SCI FI CRATE CONCEPT DESIGN - CONCEPT
For this assignment we were instructed to create a high and low poly 3D modeled sci-fi crate. The first of this assignment was to collect references and create a concept in which to build from. For this project I wanted to construct a medical crate or med-pack like crate which would not be a typical rectangular shape. I discovered a handful of more rounded, cylindrical shaped carrying devices from across multiple different artists online. These allowed me to build the basic shape of my crate and determine whether I wanted a rounded shape or if I wanted to make them more hexagon or even a triangular shape for the main shape of my crate. From there I decided that, to be a med-pack, I would add a side component which would allow for the crate to be easily carried and for there to be emergency amenities such a flashlight, radio, and pouch.

The colour palette was much easier to assemble as most medical based items tend to be either blue, green, or red accents to a mostly white and black container. I have yet to test the different palette choices I pulled on the initial concept, but am favouring the blue shades more. Some other concepts which had elements I was interested in are shown below.


No comments:
Post a Comment