PROJECT BLACK WEEK 1 - CONCEPT ART
For the Fall 2019 semester, my goal is to improve my ability to model characters from character concept art by designating my time to modelling my own original character. Having begun this as a personal project last semester, I have the resources necessary to begin modeling right away including the basic body concept I am modeling from and the clothing style which I hopefully will get to add. I am taking a lot of inspiration for the character's clothing from games of similar aesthetic and genre such as The Order 1886 and Dishonored.
Character Analysis: Marletta Black is a refined Victorian lady who acts as a British spy for Queen Victoria. She is meticulous in both her investigations and attire, keeping to the very modest, all covered up attire with accents of her high status lifestyle. Her cunning and wit aid in her sleuthing across London. She is agile and quick and that sleek sort of movement will be enhanced in her clothing design.
Concept


Project Timeline:
Week 1 Work on concept and planning
Weeks 2 & 3 Finish Blocking Out female body
Weeks 4 - 10 Detail Modeling and Clothing
Weeks 10 & 13 Texturing and UVing
Weeks 14 - End Lighting and the final render
For the Fall 2019 semester, my goal is to improve my ability to model characters from character concept art by designating my time to modelling my own original character. Having begun this as a personal project last semester, I have the resources necessary to begin modeling right away including the basic body concept I am modeling from and the clothing style which I hopefully will get to add. I am taking a lot of inspiration for the character's clothing from games of similar aesthetic and genre such as The Order 1886 and Dishonored.
Character Analysis: Marletta Black is a refined Victorian lady who acts as a British spy for Queen Victoria. She is meticulous in both her investigations and attire, keeping to the very modest, all covered up attire with accents of her high status lifestyle. Her cunning and wit aid in her sleuthing across London. She is agile and quick and that sleek sort of movement will be enhanced in her clothing design.
Concept

Project Timeline:
Week 1 Work on concept and planning
Weeks 2 & 3 Finish Blocking Out female body
Weeks 4 - 10 Detail Modeling and Clothing
Weeks 10 & 13 Texturing and UVing
Weeks 14 - End Lighting and the final render
PROJECT BLACK WEEK 2 - BLOCKING & CLEANING
 For the first few weeks of this project I spent the majority
of my time continuing the work I had already begun last semester. Following the
reference I had drawn of my character and James Taylor’s female modelling tutorial
on youtube, here, I
worked on beginning to make the connection of the body to the limbs while also
going back and correcting the topology that I already had in the model.
For the first few weeks of this project I spent the majority
of my time continuing the work I had already begun last semester. Following the
reference I had drawn of my character and James Taylor’s female modelling tutorial
on youtube, here, I
worked on beginning to make the connection of the body to the limbs while also
going back and correcting the topology that I already had in the model. 

To begin with I moved the model and reference images to the 0,0,0
point so that I could take advantage of the symmetry and mirror tool later down
the line once I had begun to model out the hands and feet.
PROJECT BLACK WEEK 3 - BLOCKING & MODELING


 Over the course of this week, I worked on compiling a massive
reference file for both the character’s head, face, and the style of clothing I’m
looking into hopefully modelling for her in the future. Wanting to get my hands
dirty and try out modelling my first human face, though I don’t believe I’ll be
using this for the final model, I worked on modelling from my references using
Zbrush. I followed more tutorials on Youtube and searched through other modeled female heads to get a better handle on how to go about the female face. I'm still deciding if I want a more realistic look or a stylistic look to the face and form, which will help to determine how the face will look for the final body.
Over the course of this week, I worked on compiling a massive
reference file for both the character’s head, face, and the style of clothing I’m
looking into hopefully modelling for her in the future. Wanting to get my hands
dirty and try out modelling my first human face, though I don’t believe I’ll be
using this for the final model, I worked on modelling from my references using
Zbrush. I followed more tutorials on Youtube and searched through other modeled female heads to get a better handle on how to go about the female face. I'm still deciding if I want a more realistic look or a stylistic look to the face and form, which will help to determine how the face will look for the final body. PROJECT BLACK WEEK 4 - FINISH BLOCKING

 This week I was determined to get the main body, hands, and feet modeled out in their low-poly forms so that I could then move into Zbrush and give the face a second shot. From the original body mesh Frank pointed out that I had been modeling the arms in a prone fashion instead of in the neutral A pose which I would need for modeling and for a future of animation, so that was the first thing I had to redo. Remodeling the arms was fairly easy using some references I gathered online via google images and after I finished that, I welded the arm and leg to the torso, cut the torso in half, then mirrored the whole thing to construct the final model. I plan to use this method once I get the hand and foot welded onto the body mesh.
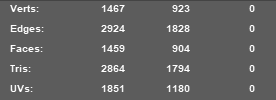
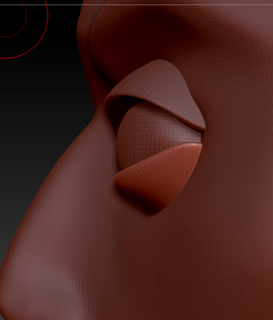
 For the topology of the hand, I looked up references of low-poly hand models on google and followed some of those patterns the best I could. While I know that this is similar to the Organic Frog model we did in 331, I'm still unsure of how exactly the topology should be flowing for the hand and into the wrist, but gave it my best shot. As for the foot, since I plan on covering the feet with shoes in the future, I knew I was going to have to retopologize the whole model so I didn't model out individual toes and instead kept the loops pretty basic and low poly for now.


Polycount :
PROJECT BLACK WEEK 5 - HEAD PLANAR SCULPT


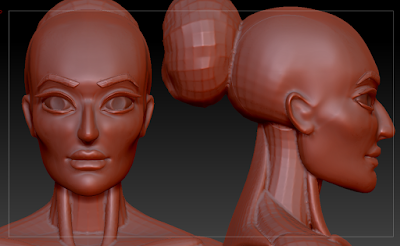
This week I started to block out the head for my character sculpt beginning with the planar's of the head and face. Taking things a lot slower and working from not only my collected stylized reference sheet, but also some planar references, I started to cut away at the head and begin to block in where the initial larger features were going to go. Using some direct character reference shots from a model of Ashe from Overwatch online, I was starting to pull out features following her front and side profile as my guides.
PROJECT BLACK WEEK 6 - BODY SCULPT

For this week I attached the hands and fee to the model in Maya before finally exporting it out as an OBJ file and importing it into Zbrush to start work on forming the main body of the sculpt. I haven't done much to add to the basic sculpt other than adding subdivisions to smooth out the mesh, clay sculpt the breasts, and have begun to move around a lot of the topology to get a more pleasing anatomy from the body, working on the limbs and hands next to help shape and give them better volume.

PROJECT BLACK WEEK 7 - HEAD SCULPT & STYLE CONSIDERATION
 For this week I was working on solidifying the planes of the face and really trying to solidify the head and facial shape before I get into the details of the face. Working from my collected references shown above, the concern I have now is that for the time it's taking me, I'm considering scaling back the style again to something a bit softer and stylistic. The style I was starting to consider was something akin to an artist I like, cakiebakie, who draws faces much softer and more caricature like.


 For this week I was working on solidifying the planes of the face and really trying to solidify the head and facial shape before I get into the details of the face. Working from my collected references shown above, the concern I have now is that for the time it's taking me, I'm considering scaling back the style again to something a bit softer and stylistic. The style I was starting to consider was something akin to an artist I like, cakiebakie, who draws faces much softer and more caricature like.


PROJECT BLACK WEEK 8 - HEAD SCULPT

 This week I spent most of my time, once again, working through the head sculpt since I know a lot of the body itself will be obscured with clothing. Working first with the polish brush and a reference for the planes of the face, I started with a new sphere which I shaved down into the basic shapes of the a generic face shape. Then I went in with the move topology brush to shift some things around to make it closer to the face shape that I want for my character based on the references I collected in week 3. From there, I used my previous posted references from week 7 & 6 to start really shaping up the features of the face such as the eye sockets, eye brows, and nose. My biggest challenge at present is the formation of the lips, which I am trying to understand how to get that more protruding look, that pucker, without it looking like just a pile of clay on the face. My other challenge is in figuring out the shape and thickness of the eye and eye folds which in the more Blizzard style seem to have a singular lash shape that I would like to include in my final version too. Overall, this is the happiest I've been with this face in a long time.
This week I spent most of my time, once again, working through the head sculpt since I know a lot of the body itself will be obscured with clothing. Working first with the polish brush and a reference for the planes of the face, I started with a new sphere which I shaved down into the basic shapes of the a generic face shape. Then I went in with the move topology brush to shift some things around to make it closer to the face shape that I want for my character based on the references I collected in week 3. From there, I used my previous posted references from week 7 & 6 to start really shaping up the features of the face such as the eye sockets, eye brows, and nose. My biggest challenge at present is the formation of the lips, which I am trying to understand how to get that more protruding look, that pucker, without it looking like just a pile of clay on the face. My other challenge is in figuring out the shape and thickness of the eye and eye folds which in the more Blizzard style seem to have a singular lash shape that I would like to include in my final version too. Overall, this is the happiest I've been with this face in a long time.


PROJECT BLACK WEEK 9 - EYES
For this week I really wanted to just focus on redoing and modular modeling the eyes of my model so that I could control the eyelid and eye shape a lot more than when I was trying to sculpt out an ocular cavity. Using the tips Frank gave me from last week, appending two spheres onto my canvas, slicing them in half, one top and one bottom, and rotating them into place to form the upper and lower lids of the eye. From there I appended another sphere to fit the eyeball itself and then went in with the move brush to adjust the lids to my desired shape. I had a lot of trouble in the beginning modeling the eye using this method just because I polished the space where I had previous sculpted out eyes and it was proving difficult to place eyes back into the scene without her coming away with an almost glaring look. I also did not anticipate the problems I'd face mirror and welding the basic forms in before going in and editing the lid shapes, so when I tried to individually rotate and maneuver the lids it was proving much more harder than I thought. After I restarted a few times, I finally decided to just model out one eye in full before I mirror and weld the other, just so I can have better control over the model and the shape. I was aiming for a sharper, more almond shaped eye for my character, something more coy looking, without crossing into a more Asian looking character, so hopefully that translates well.


For this week I really wanted to just focus on redoing and modular modeling the eyes of my model so that I could control the eyelid and eye shape a lot more than when I was trying to sculpt out an ocular cavity. Using the tips Frank gave me from last week, appending two spheres onto my canvas, slicing them in half, one top and one bottom, and rotating them into place to form the upper and lower lids of the eye. From there I appended another sphere to fit the eyeball itself and then went in with the move brush to adjust the lids to my desired shape. I had a lot of trouble in the beginning modeling the eye using this method just because I polished the space where I had previous sculpted out eyes and it was proving difficult to place eyes back into the scene without her coming away with an almost glaring look. I also did not anticipate the problems I'd face mirror and welding the basic forms in before going in and editing the lid shapes, so when I tried to individually rotate and maneuver the lids it was proving much more harder than I thought. After I restarted a few times, I finally decided to just model out one eye in full before I mirror and weld the other, just so I can have better control over the model and the shape. I was aiming for a sharper, more almond shaped eye for my character, something more coy looking, without crossing into a more Asian looking character, so hopefully that translates well.


PROJECT BLACK WEEK 10 - MODULAR BODY MODEL

This week, as apart of another class, I modularly modeled a stylized female body in zbrush. The original character concept I made the body for was a much more slender body type, so I had to go in and adjust the hip, thigh, rib cage, shoulder, and waist size to reflect a more hour glass figure. Since I am already working on the head in a separate ztl, I'm keeping the head in this body very rudimentary since I plan on just cutting it and then appending the head sculpt once it's done.
This week, as apart of another class, I modularly modeled a stylized female body in zbrush. The original character concept I made the body for was a much more slender body type, so I had to go in and adjust the hip, thigh, rib cage, shoulder, and waist size to reflect a more hour glass figure. Since I am already working on the head in a separate ztl, I'm keeping the head in this body very rudimentary since I plan on just cutting it and then appending the head sculpt once it's done.
PROJECT BLACK WEEK 11 - MARVELOUS DESIGNER TEST


My eight hours this week was spent entirely learning and dealing with Marvelous Designer (MD) and learning that my laptop doesn't handle the program well. I loaded the basic, unrefined body obj into the program so I could begin testing out and learning how it worked, only to discover that it was a lot harder than I expected. On top of the constant freezes and hours it took to just stitch a basic shirt together, I had to learn a different set of hot keys for movement within the program window itself. Unlike the programs we use in the major, where most of the movement is relatively similar and the gizmo behaves generally the same, MD is an entirely different horse that I did not prepare enough for before going in. I had hoped to at least get a shirt and pants done, but my laptop continuously froze, slowed dramatically, and at times even shut down the program even when it was the only one active. If I plan to continue using it, I'll have to use the program on my partner's computer, rather than just my laptop.
My eight hours this week was spent entirely learning and dealing with Marvelous Designer (MD) and learning that my laptop doesn't handle the program well. I loaded the basic, unrefined body obj into the program so I could begin testing out and learning how it worked, only to discover that it was a lot harder than I expected. On top of the constant freezes and hours it took to just stitch a basic shirt together, I had to learn a different set of hot keys for movement within the program window itself. Unlike the programs we use in the major, where most of the movement is relatively similar and the gizmo behaves generally the same, MD is an entirely different horse that I did not prepare enough for before going in. I had hoped to at least get a shirt and pants done, but my laptop continuously froze, slowed dramatically, and at times even shut down the program even when it was the only one active. If I plan to continue using it, I'll have to use the program on my partner's computer, rather than just my laptop.
PROJECT BLACK WEEK 12 - BACK TO THE FACE

 The majority of this week I decided to spend my time working on the face sculpt since I threw the base body mesh into Marvelous Designer last week. Having taken the planar head and added it to the modular body mesh, I merged everything, Zremeshed, and then dynameshed the whole thing so that I could start smoothing the pieces together. Using the topology tool, I build out the eyebrows and both set of lashes which I will probably go back into bring them out a little more to define them better, and using the brushes from Shane Olson's site, 3D Character Workshop, I took the detail brush to tighten areas around the eyes, nose, and lips so that they were better defined and to help give them more shape. After I was mostly satisfied with the face, I inserted a sphere primitive, scaled it down inside the head of my model, and then used the clay build up brush to block out the hair line and the hair style which I am aiming for for this character. Later I hope to go back through with the detail brush and potentially the pinch brush to define large pieces of the hair and create a better hair part.
A challenge I faced during this process was trying to figure out how to set the eyes farther back within model to show a more Caucasian woman, but probably due to having already dynameshed everything together it makes it harder to move back the eye sockets further in the model without pulling everywhere else.
The majority of this week I decided to spend my time working on the face sculpt since I threw the base body mesh into Marvelous Designer last week. Having taken the planar head and added it to the modular body mesh, I merged everything, Zremeshed, and then dynameshed the whole thing so that I could start smoothing the pieces together. Using the topology tool, I build out the eyebrows and both set of lashes which I will probably go back into bring them out a little more to define them better, and using the brushes from Shane Olson's site, 3D Character Workshop, I took the detail brush to tighten areas around the eyes, nose, and lips so that they were better defined and to help give them more shape. After I was mostly satisfied with the face, I inserted a sphere primitive, scaled it down inside the head of my model, and then used the clay build up brush to block out the hair line and the hair style which I am aiming for for this character. Later I hope to go back through with the detail brush and potentially the pinch brush to define large pieces of the hair and create a better hair part.
A challenge I faced during this process was trying to figure out how to set the eyes farther back within model to show a more Caucasian woman, but probably due to having already dynameshed everything together it makes it harder to move back the eye sockets further in the model without pulling everywhere else.

PROJECT BLACK WEEK 13 - FINISHING THE FACE
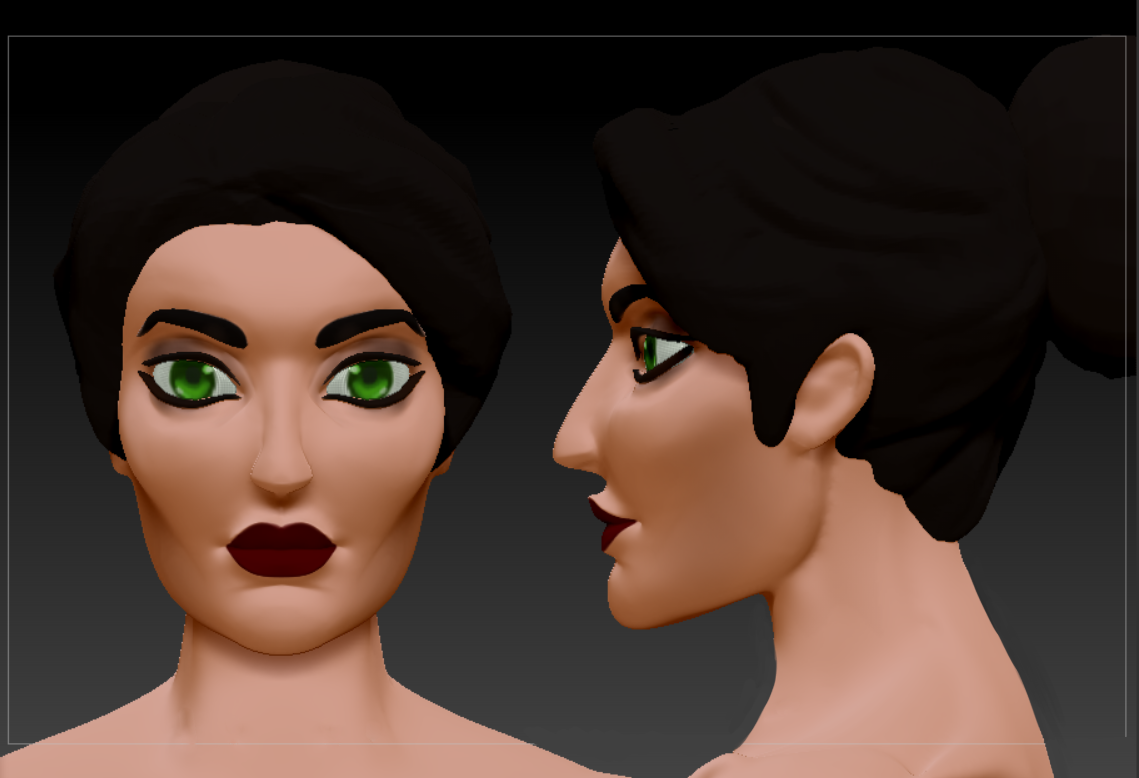
For this week I spent most of my time compiling my senior portfolio presentation while also going over the head and finishing up the facial features and proportions. Using the move tool I was able to push her eyes further to give her a more Caucasian appearance, rather than an Asian look, which I then had to go in an smooth and relax. Unfortunately, since the eye lashes and brows are not on separate subtools, I had to be careful while manipulating the whole eye area as everything would become effected if I wasn't careful. Once I had finalized things, I went in with the Shane Olson detail brush and accentuated the features which I wanted to have more of an edge and using alt+brush, I was able to define the bridge of her nose and lip shape a lot better. I also added some materials and polypaint, just to see how the product could look.
No comments:
Post a Comment